Background:
Reverse proxies are useful if you are hosting websites on your network and want to have a single access point for connections from the Internet. WinGate's WWW proxy service can be configured to reverse proxy incoming connections from the Internet to the web server running on your network.
When WinGate is used for both a forward proxy and a reverse proxy, ideally there will be at least two network adapters in the WinGate server to allow the separation of forward and reverse proxies. This allows you to run both proxies on the same port, but on different adapters, and allows you to apply access rules separately to both forward and reverse proxies.
We recommend that you set up a new WWW proxy service to use as a reverse proxy.
Task:
Create and configure the reverse proxy
Secure the reverse proxy
Steps:
Create and configure the reverse proxy
- In the WinGate console, go to Control Panel::Services and choose Install Service.
- Select the WWW Proxy Service, click Next
- Name the service, e.g. Reverse Proxy Service
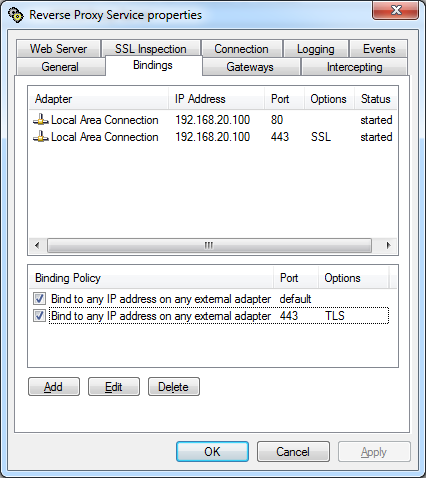
- Select the Bindings tab, delete the binding policies "Bind to any IP address on any internal adapter" and "Bind only to 127.0.0.1 on Software Loopback Adapter", Click Add and create a new binding policy to bind to "Any External Adapter". To accept https connections, add a second binding policy and check the port override box to listen on port 443. Check the box under Channel Security to "immediately negotiate secure channel", note that you will need to have imported a certificate into WinGate to use this option.
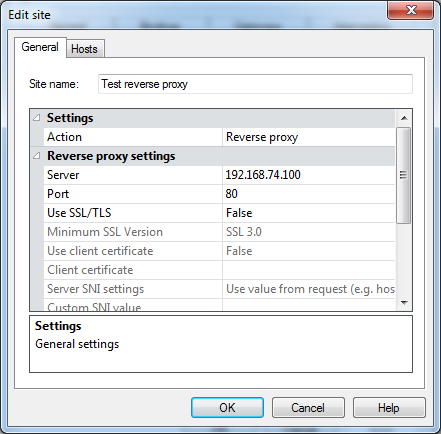
- Select the Web Server tab, leave the default site set to reject request and click Add to add a new site
- Name the site for your reference, e.g. reverse proxy, set the action to Reverse proxy
- Enter the IP address or network name of the web server hosting the site, enter the port that the site is running on
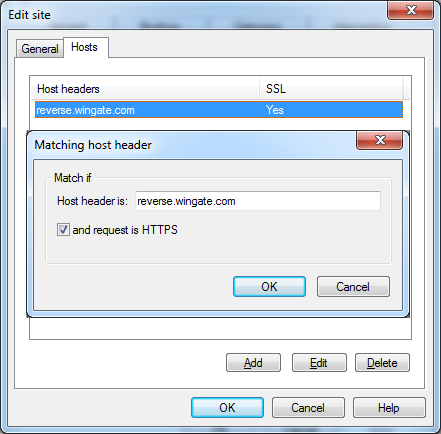
- Select the Hosts tab, enter the site name that users will use to reach the site, e.g. reverse.wingate.com For https connections, add a new site, enter the server IP and port, enter the site name on the Hosts tab and check the box to match if request is https
Secure the reverse proxy
- In the WinGate console, go to Web Access Control::Access Rules, choose Add Rule from the Tasks panel
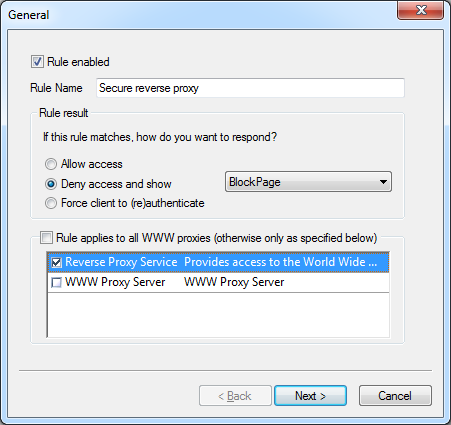
- Name the rule, e.g. Secure reverse proxy
- Set the rule result to "Deny access and show", select a different block page if required
- Uncheck the box "Rule applies to all WWW proxies" and select the Reverse proxy, click Next
- On the Who tab, choose Everyone from the dropdown, click Next
- On the Where tab, leave All IPs selected, click Next
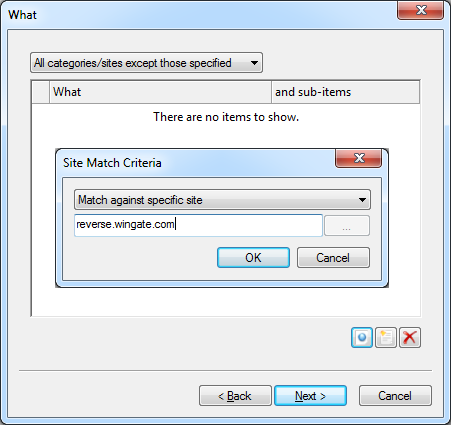
- On the What tab, choose "All categories/sites except those specified" and add a new site, enter the site name, e.g. reverse.wingate.com, click Next
- On the When tab, leave the "Rule applies always" box checked, click Finish
|